Table of Contents
Can yoga really help you get rid of pain and stiffness in Rheumatoid arthritis?
A few days back, one of my patients suffering from chronic pain in hands and legs- a case of arthritis- asked me ” Doctor, I find it difficult to move my legs and arms. Can Yoga help me in any way?”
My spontaneous reply was “Yes”. I did not know much about Yoga at that time, but having replied to the patient, I thought I should do thorough research on the topic and see which yogasanas can benefit my patients of arthritis. And the result of that research is the article you are reading now!
Did you know that practicing 20-minute sequences of specific yoga poses twice a week can improve your range of motion and strength, reduce pain and stiffness, increase mobility, and even lower your stress levels? Yes, and this is true- yoga helps in all these problems of health.
Arthritis is among the most widespread chronic conditions in the world today. In the U.S., about one in five adults has some form of arthritis. Over time, it can wreak havoc on the body, causing permanent joint damage and difficulty performing everyday activities.
The statistic in India reports a similar figure [ read the quote below]-
In India, approximately one percent of the population suffers from rheumatoid arthritis. Therefore, as per calculations almost 10 lakh people suffer from this type of arthritis.
Source- First post.
The good news is that yoga is an excellent way to manage these effects. The poses ease pain by stretching muscles, improving circulation, reducing stress, and increasing range of motion. It also improves balance and coordination while relaxing both body and mind.
Before I begin.…..
Frankly speaking, I know very little about yoga and neither do I know much about what I am about to describe below. However, whilst researching several types of exercise for treatment of Rheumatoid arthritis, I came across some nonconventional exercise like qigong, yoga, and tai chi.
I went deeper into my research and found that yoga practice does have its own benefits. I would like to mention here that I do have arthritis- Osteoarthritis of the knees. As I researched further, I started practicing some of these yoga poses. Believe me, they helped relieve my joint pains and stiffness. And, so, I thought that I should share with you all.
International Yoga Day
June 21 is considered International Yoga Day. In India, our Prime Minister Shri Narendra Modi, takes part in celebrating the Yoga Day. His Stake on Yoga-
Yoga is a symbol of Universal Aspiration for Health and
–Narendra Modi
Well-being. It is a Health Assurance on Zero Budget.
What are the precautions before and after starting yoga?
- First and foremost- if you are undergoing any treatment for RA or any arthritis, consult your family physician whether you should take up yoga for your condition.
- Start off slowly. It would be best if you could join a yoga class and discuss your arthritis with the instructor. He will be your best guide to which asanas/poses are good for you.
- Practice one asana at a time and scale up gradually.
- While performing the asana, at any time you feel discomfort, just stop.
- Avoid doing asanas during flareups of RA.
Here are some poses to help manage arthritis as well as other common discomforts like back pain or sore hips after long hours at work or sitting at school all day long. So, let’s begin-
Before I start describing each one, be sure to buy one good yoga mat. This helps a lot as it prevents fall due to slipping and also encourages you to do the asanas.
Yoga poses 1: Morning Stretch Sequence
Focusing on the major muscle groups in the body, this sequence or yoga pose targets the joints, improving flexibility and range of motion.
It also helps prevent injury and improves focus and mood, making it a great choice for any time of day.
Begin in a standing position with feet hips-width distance apart, knees slightly bent.
Fold your hands behind your back and interlace the fingers.
Gently pull back on the hands while squeezing your shoulder blades together.
This opens up the chest and stretches the arms and shoulders.
Keeping your arms behind your back, tilt your head to one side while dropping the ear down to the shoulder on the same side.
Then, repeat on the other side. Rotate your head so that you are looking slightly above the horizon.
This stretches the neck and shoulders.
Yoga poses 2: Adho Mukha Svanasana – Downward Facing Dog
This Yoga pose is a great way to open up the body and release tension in the hips, legs, and spine. It also improves posture and reduces back pain. This is a great pose for beginners, but even those with lots of experience can benefit from it. Start on your hands and knees in a tabletop position.
Take a deep inhale and lift your hips, bringing your knees off the ground.
Push your heels into the ground and stretch your toes toward the sky.
Keep your knees hips-width distance apart and your spine extended.
I do this to relieve pain in my lower back.
Yoga pose 3: Tadasana – Mountain Pose
This pose is beneficial for improving posture, reducing anxiety, and removing fatigue.
It is another one of those poses that is great for beginners, but even those with lots of experience can benefit from it.

Stand with feet hips-width distance apart, toes pointed forward, and hands at the sides. Take a deep inhale, pressing your feet into the ground and lifting your arms to the sky.
Let your head rest between your arms and eyes close.
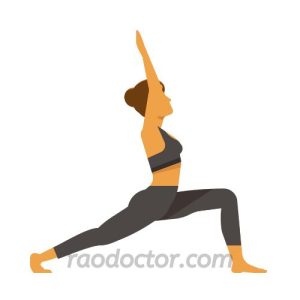
Yoga poses 4: Virabhadrasana- Warrior pose
This pose is great for opening up the hips, legs, and torso. It is also helpful for reducing stress and anxiety.
Begin in a standing position. Take one wide step to the side, with your toes turned slightly inward and your other foot turned slightly outward.
Bend the knee so that your knee is over your foot.
Yoga is great for people of all ages and fitness levels.

It is particularly helpful for those who cannot perform high-impact exercises due to injury or conditions such as arthritis.
The great thing about yoga is that there are many variations of poses and sequences, so you can tailor your practice based on your needs.
With just a little bit of practice each day, you can reduce pain, improve your mood, and enjoy the many benefits of yoga.
.
Yoga poses 5: Vrikshasana-Tree Pose
This pose is great for –
- Improving strength of back and leg muscles
- Improves Body balance.
- Improves range of motion of knees and spine
- Relieves pain of RA
How to do it-
- Stand with your feet close to each other.
- Now raise one of your legs slowly
- Bring the sole of this foot above the knee of the opposite leg.
- Place the foot on the opposite thigh
- Slowly raise your hands above your head so that fingers are pointing upwards and the palms facing each other
- Take a few deep breaths, hold it for a few seconds, release your breath and slowly bring down your hands and feet to the ground.
- Repeat the same on the opposite leg.
Yoga poses 6: Ardha Chandrasana – Half Moon Pose
This pose is great for opening up the body and stretching the hips, legs, and spine. It is also helpful for reducing stress and anxiety. Begin in Mountain pose. Take a wide step to the side, with your toes turned slightly inward and your other foot turned slightly outward. Bend the knee so that your knee is over your foot.
Yoga poses 7: Urdhva Mukha Svanasana-Upward Facing Dog Pose
How to do it
- Lie facing downwards on your tummy with your feet about a hip-width apart.
- Straighten your toes and press the tops of your feet against the mat.
- With your palms down, rest your hands alongside your abdomen, fingers pointing towards the top of the mat as shown in the video.
- Get ready to lift your upper part of body.
- Gently lift your head and chest, lengthen your arms completely and press down with your palms. Now lift your knees off the floor.
- Use your inner thighs and calves to help you lift your legs and pelvis off the mat.
- Apply your weight on your hands and the tops of your feet or toes, so that the rest of your body gets lifted off the floor.
- Push your chest forward and your shoulders backwards. Now,using all of your arm muscles, arch your upper back.
- Start breathing in and hold it there, breathing deeply, for 30 to 60 seconds.
- Finally, lower down slowly and relax.
Benefits Of This Yoga pose
This pose gives great benefits by-
- Preventing hunch back of the spine due to constant sitting posture for those who work on computers or in an office.
- The stretching of the abdominal muscles gives a good massage to the abdominal organs.
- The extension of the cervical and thoracic spine and contraction of the muscles in the lumbar spine helps all the back muscles stretch, work, and become strong.
- It offers a deep backbend, which helps improve posture and effectively relieve mild to moderate back ache.
- Strengthening and toning the wrist and muscles of the arms by pressure of arms and hands while pressing them down.
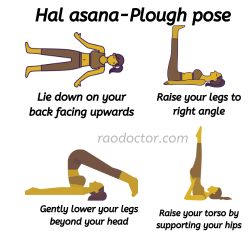
Yoga poses 8: Hal asana – Plough Pose

This pose is great for stretching the torso and relieving lower back pain.
How to do it
- Begin in a lying down position.
- Extend your legs as shown above.
- Next, place your hands by the side of the body and raise both legs.
- Now, place both your hands on the hips/torso, then slowly lower your legs behind your head.
- At the same time, bring your hands back to the same position as before.
- Slowly revert back to the lying down position
Benefits of Hal asana
Hal asana has many benefits, and we will only talk about how it helps in rheumatoid arthritis. They are as given below-
- Hal asana stretches your spine, strengthens, and tones your back muscles.
- It helps release the stiffness in your neck, shoulders, and back and helps reduce its recurrence.
- This asana also improves the strength of your shoulders, arms, and legs.
- It enhances flexibility, which improves muscle and joint mobility.
- It also makes your spine more flexible, which may help ease muscle tension and improve posture.
- Increase in flexibility also reduces your chance of injury and improves your regular day to day mobility of your joints affected by RA.
Yoga poses 9: Utthita Parsvakonasana – Extended Side Angle Pose
This pose is great for opening up the hips and stretching the legs and torso. It is also helpful for reducing stress and anxiety.
How to do it-
Step 1: Begin by standing in Tadasana
Step 2: Turn and lunge your right leg out to the side.
Step 3: Bend and reach your left arm up towards the ceiling while turning your head to look up at it from your peripheral vision.
Step 4: Now, take a deep breath, lift your torso and straighten your right arm up above your head as well.
Step 5: Hold for 30 seconds before returning to Tadasana and then repeating on the other side.

Benefits of this pose
- Strengthens and stretches the legs, knees, and ankles.
- Stretches the groins, spine, waist and shoulders.
Conclusion-
Utthita parsvakonasana is a challenging pose that requires a lot of balance, strength, and flexibility. It is important to build up your strength and flexibility through consistent yoga practice so that you can perform this pose with ease.
Conclusion
When practicing yoga, pay close attention to your body’s signals. You can tell if an asana is right for you by the amount of discomfort you feel in a particular pose. If you feel any pain or discomfort, just stop. If you can’t bear the pain, move to a different position.
If the pain increases and you feel dizzy, stop, and recover in a seated position. Also, remember to take your time while practicing yoga. It should be gradual.
These poses should be done slowly and correctly. With practice and patience, they can help you feel more relaxed while reducing stress and improving joint health.
If you have found this article useful, do share it with others whom you feel should know about the benefits of yoga in arthritis. Also, please fill in the subscription below so that you get my next article in your mail .
Thank you for reading. Adios.
Want to learn more? Click below-
Some useful resources- Yoga Poses for Arthritis Patients from Johns Hopkins
